Python Sensing and Behavior
CSC 105 - The Digital Age - Weinman
- Summary:
- In this laboratory, you complete the journey and joy
of learning to write computer programs in the Python programming language
by incorporating sensors to drive behavior.
So far, all the functions we have written work by executing each statement
in the function in order, from top to bottom. To write programs that
solve more complex problems, we need mechanisms that will allow statements
to be executed in more complex ways. For example, we might like to
execute some statements under some conditions but not others, or we
might like to execute some statements multiple times. These require
our algorithmic ingredients of conditionals and repetition.
A. Preparation
- Open a terminal window and launch the Calico program by typing (or
pasting) the following command
-
/opt/Calico/calico &
- In the Calico window that opens, click the Shell tab. You
should see a blank white window with a python> prompt and
a blinking cursor.
- In the tab titled "New Python Script", enter comments (lines beginning
with # for you and your partners names, and the title of
this lab.
- Save the file in your 105 folder as robotLab.py
Sensory recall
Today's reading introduces several categories of sensors your Scribbler
robot come equipped with. For example,
- getLight() returns a list of the values of all three light
sensors (front), [0 (bright) to 65535 (dark)]
- getIR() returns a list of the value of both infrared sensors
(front), [0 (obstacle) or 1 (clear)]
- getObstacle() returns a list of the values of all three infrared
obstacle sensors (fluke), [ 0 (clear) to over 1100 (obstacle)]
B. Testing sensors
For each of the three sensor classes listed above, we will test the
consistency of the sensory readings they give under various conditions.
- Locate the three light sensors on the front of the Scribbler.
- Turn on your robot. In the Shell, give the usual commands
for beginning a session with the robot:
-
from Myro import *
initialize("/dev/rfcomm0")
- Turn your robot on and face it away from a window or place it somewhere
slightly dark. (Make sure you can still see the screen and the robot
at the same time!)
- To test the light sensors, be ready with some extra light source such
as a flashlight or phone equipped as such.
-
In the Shell, enter the following
commands to take and print readings from the light sensors for 30
seconds. While the program runs, shine light at the robot, leave it
dark, and shine light more on some sensors than the others. Watch
the readings as you do so and see how reliable the effects are and
what the levels are for brightness and darkness.
-
for t in timer(30):
getLight()
- Locate the infrared sensors on the front of the Scribbler.
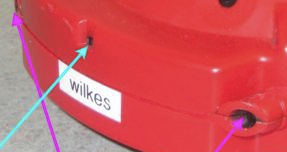 The IR sensors are marked in magenta, while the IR emitter is in the
center, marked in cyan.
The IR sensors are marked in magenta, while the IR emitter is in the
center, marked in cyan.
- Move your robot back to your desk or some other similar, convenient
location. Make sure there is plenty of space in front of the IR sensors.
- In the Shell, enter the following commands to take and print
readings from the IR sensors for 60 seconds. While the program runs,
begin with something large far away from the robot and see if and
when you can get the IR sensors to fire (that is, move from 1 to 0)
as you move closer. Test the behavior of each sensor (left versus
right) separately, too.
Note: if your obstacle gets too close, otherwise the emitter's
beams will not reflect to the sensors.
-
for t in timer(60):
getIR()
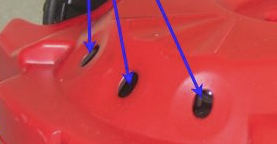
- Finally, we will test the so-called "obstacle" sensors. Locate
these on the Fluke board.
- Position you robot so these obstacle sensors are clear and easy to
experiment with.
- In the Shell, enter the following commands to take and print
readings from the obstacle sensors for 60 seconds. While the program
runs, begin with something large far away from the robot and see how
the obstacle sensors change as you move it closer. Test behavior of
each sensor (left versus right) separately, too.
-
for t in timer(60):
getObstacle()
- Summarize your findings on the reliability and scale of the measurements
for each sensor.
D. Modeling Behavior
Now that we have our own sense of how the robot sensors respond, we
can implement some of the Braitenberg behaviors described in our reading.
We begin by making the light sensors slightly more robust in defining
the ambient environmental light level.
- Take an average of the three sensor' readings. After the introductory
comments in your script (names, etc.) add the following lines.
-
from Myro import *
initialize("/dev/rfcomm0")
# Ambient environmental light values
ambientLight = sum(getLight())/3.0
- Save and run your script.
- After it runs, type the variable name ambientLight in the
Shell and press Enter to see the value recorded.
- Based on your experience in part B.5, does this
value seem sensible?
- Next we want to rescale the range of the light sensors from their
original range,
[0 (bright) to 65535 (dark)]
to a modified range that can be used to drive the motors. The following
function is described in
the reading.
-
def exciteNormalizeLight(value):
if value > ambientLight:
value = ambientLight
return value/ambientLight
Add this function to your script.
- Save and run your script again.
- Query the new value of ambientLight; it should be similar
to before.
- What results do you expect the following calls to normalizeLight
to produce? (Think about them, don't run them yet.)
-
exciteNormalizeLight(0) # Very bright
exciteNormalizeLight(ambientLight/2) # Moderately bright
exciteNormalizeLight(ambientLight) # Ambiently bright
exciteNormalizeLight(ambientLight*2) # More dark
- Verify your predictions by running those commands in the Shell.
-
The following function is adapted from Braitenberg
vehicle 2.
-
def behavior2(numSeconds):
for t in timer(numSeconds):
leftLight = getLight("left")
rightLight = getLight("right")
motors( exciteNormalizeLight(leftLight), exciteNormalizeLight(rightLight) )
stop()
Consider your answers to the previous question. While the function
is running, what will happen if you shine a light (think about the
answers, don't run them yet):
- on the right sensor?
- on the left sensor?
- on both sensors?
- Add the function to your script pane, but name it either coward
or aggressive (rather than behavior2) based on the
behavior you described. Then save and run your script again. Verify
your predictions by running the function. Does it have the behavior(s)
you predicted?
- Now create a mirror version of the function where the leftLight
drives the right motor, and vice versa. Name this function either
coward or aggressive based on the behavior you expect.
- Save and run your script.
- Test your function. Does it have the appropriate (opposite) behavior?
E. Inhibitions
The function normalizeLight above uses what the reading calls
an excitatory normalization. Here we consider the inhibitory
variety.
- We want to rescale the range of the light sensors from their original
range,
[0 (bright) to 65535 (dark)]
to a modified range that can be used to the motors.
The following function is described in
the reading.
-
def inhibitNormalizeLight(value):
if value > ambientLight:
value = ambientLight
return 1.0 - value/ambientLight
Add this function to your script.
- Save and run your script again.
- Query the new value of ambientLight; it should be similar
to before.
- What results do you expect the following calls to normalizeLight
to produce? (Think about them, don't run them yet.)
-
inhibitNormalizeLight(0) # Very bright
inhibitNormalizeLight(ambientLight/2) # Moderately bright
inhibitNormalizeLight(ambientLight) # Ambiently bright
inhibitNormalizeLight(ambientLight*2) # More dark
- Verify your predictions by running those commands in the Shell.
- Using the function behavior2 from D.5 as a
model, create the Braitenberg creatures Love and Explorer
described
in the reading by using the inhibitory normalization above. (That
is, write functions love and explorer that each
take numSeconds as a parameter.)
F. Exploring Behavioral Combinations
Instead of normalization, we can think about using conditionals to
drive the motors. (If you don't remember the if statement,
the reading
will remind you). Using the if statement inside a timer
loop as we did in the functions you wrote above, write the following
behavior functions that demonstrate the described behavior for a given
amount of time.
- Timid
- When the center light sensor detects light (i.e., above
the ambient level), it moves forward, otherwise it stays still.
- Indecisive
- Indecisive is similar to Timid, except, it never stops:
its motors are always running, either in forward direction, or in
reverse direction, controlled by the threshold light sensor: When
the light sensor detects light (i.e., above ambient levels), it moves
forward, otherwise, it moves backwards.
G. For those with extra time
If you still have time left, implement one or more of the other reactive
behaviors described in the reading.
- Light orientation
- Light follower
- Avoiding obstacles
or one of your own choosing.
Scribbler images are licensed under a Creative
Commons Attribution-NonCommercial-ShareAlike 4.0 International license;
the originals by Henry Walker are here.
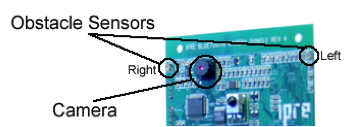
The fluke image is from Learning
Computing With Robots Using Calico Python by Deepak Kumar. Used
by permission.
Copyright © 2015 Jerod
Weinman.
 This work is licensed under
a Creative
Commons Attribution-Noncommercial-Share Alike 4.0 International License.
This work is licensed under
a Creative
Commons Attribution-Noncommercial-Share Alike 4.0 International License.