HW4: Color-Reducing Filters
Due: 9 a.m. Wednesday, 18 February 2009
Summary: In this assignment, you will build several image filters that reduce the range of colors in an image in interesting ways.
Purposes: To implement some classic image filters. To gain further experience working with higher-order procedures. To consider strategies by which complex problems can be broken down into smaller parts.
Expected Time: Two to four hours.
Collaboration: We encourage you to work in groups of size three. You may, however, work alone or work in a group of size two or size four. You may discuss this assignment with anyone, provided you credit such discussions when you submit the assignment.
Submitting:
Email your answer to <weinman>. The title of your email
should have the form HW4 and
should contain your answers to all parts of the assignment. Scheme code
should be in the body of the message.
Warning: So that this assignment is a learning experience for everyone, we may spend class time publicly critiquing your work.
Preliminaries
Load a moderate-sized image (no more than about 250x250) and name the
loaded image source.
Assignment
Problem 1: A Greyscale Filter
You may remember that in the reading on local bindings, we
discussed the design of rgb-greyscale, a procedure
to convert an rgb color to an equivalent shade of grey. Here is that
procedure again.
;;; Procedure:
;;;   rgb-greyscale
;;; Parameters:
;;;   color, an RGB color
;;; Purpose:
;;;   Compute a greyscale version of color.
;;; Produces:
;;;   grey, an RGB color
;;; Postconditions:
;;;   grey is likely to be interpreted as the same brightness as color.
(define rgb-greyscale
  (lambda (color)
    (let ((component (+ (* 0.30 (rgb-red color))
                        (* 0.59 (rgb-green color))
                        (* 0.11 (rgb-blue color)))))
      (rgb-new component component component))))
Write a new procedure, (, that produces a greyscale version of
image, leaving the original unchanged.
image-greyscale
image)
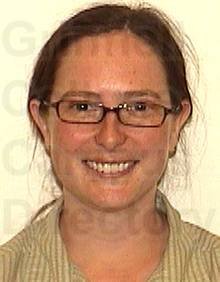
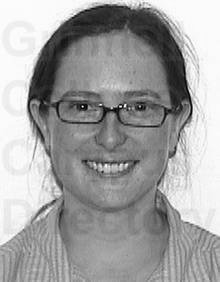
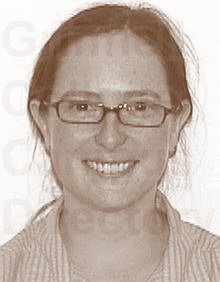
For example, here is the result of applying
image-greyscale to Professor Davis's StalkerNet
image.
 |
 |
Problem 2: Range Conversion
Sometimes we find that procedures output values in one range, but
we want them to output values in a different range.
For example, it might be useful to
convert the output from sin, in the range [-1..1],
to a value in the range [128..255].
As another example, we might have a red component in the range [0...255], but
want to limit the range to [92..255] so there is always at least some
red.
We'd like the mapping to be somewhat
linear, so that smaller values in the input range become smaller
values in the output range, and larger values in the input range become
larger values in the output range.
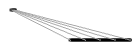
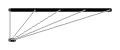
For example, suppose the source range is [1..5] and the target range is [60..120]. Since 1 is the lowest value in the source range, it would map to 60 in the target range. Since 5 is the largest value in the source range, it should map to 120 in the target range. Since 2 is 1/4 of the way across the source range, it should map to 75, which is 1/4 of the way across the target range. Since 3 is 1/2 the way across the source range, it should map to 90, which is 1/2 the way across the target range. You should be able to figure out what 4 maps to. The following (unlabeled) figure shows the general effect of the conversion from [1..5] to [60..120]. The top row is the source and the bottom is the target.
Here's another example, in which we map values in the range [20..40] to values in the range [0..150].
So, how do we make all of this happen? Our goal is
to write a Scheme procedure, (.
range-convert
val source-lower
source-upper target-lower
target-upper)
>(range-convert 1 1 5 60 120)60>(range-convert 2 1 5 60 120)75>(range-convert 3 1 5 60 120)90>(range-convert 4 1 5 60 120)105>(range-convert 5 1 5 60 120)120>(range-convert 100 60 120 1 5)3.666666667>(range-convert -1 -1 1 128 255)128>(range-convert 0.25 -1 1 128 255)207.375
However, that is a relatively complex goal, so we'll consider the problem in steps. As you work through these steps, be sure to test each procedure you write with some of the given examples.
Step One
Let's start with a simplified version of the problem. Suppose we want
to convert a number in the range [0..source-upper]
to a number in the range [0..target-upper],
with 0 mapping to zero, source-upper mapping to
target-upper, and things in between to numbers
in between.
For example, if source-upper is 4 and
target-upper is 100,
- 0 would map to 0,
- 1 would map to 25,
- 2 would map to 50,
- 3 would map to 75, and
- 4 would map to 100.
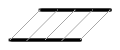
The following (unlabeled) figure shows this conversion.

Similarly, if source-upper is 100 and
target-upper is 4,
- 0 would map to 0,
- 10 would map to 0.4,
- 25 would map to 1,
- 40 would map to 1.6,
- 50 would map to 2,
and so on and so forth.
a. Write a procedure, (, that does the conversion just described.
range-scale val source-upper target-upper)
Step Two
What if the source range or the target range doesn't start at 0? Let's start with the case in which the source range does not start with 0. We can certainly shift each value in that range, giving a range of equal size. For example, if the range is [4..10], we must shift the 4 to 0, which requires subtracting 4, so we might shift the 5 to 1 (again by subtracting 4), the 6 to 2, and 7 to 3, the 8 to 4, the 9 to 5, and the 10 to 6. Similarly, if the range is [-2..3], we should shift the -2 to 0 (by adding 2), which means we shift -1 to 1, 0 to 2, 1 to 3, 2 to 4, and 3 to 5.
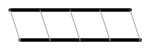
Here's an illustration of what happens when we shift the range [30..100] to [0..70].
b. Write a procedure, (
that shifts a value in the range
[shift-source
val source-lower)source-lower..source-upper]
to the range [0..some-value].
A quick thought question: What is the upper bound of that range?
That is, what is some-value? You need not
answer this question in your writeup, but you will need to figure out
the answer in order to write the final version
of range-convert.
Step Three
For the target, we want to do the reverse of
shift-source. That is, we will
start with a value in the range [0..another-value]
and shift the 0 to target-lower, 1 to
target-lower+1, and so on and so forth.
For example, here's an illustration of shifting [0..120] to [10..130]
c. Write a procedure, (, that does that
shift.
shift-target
val target-lower)
Another thought question: If we follow that process, what value
should another-value have so that we
shift it to target-upper? You don't need
to answer this question in your writeup, but you will need
to have an answer in order to write the following code.
Step Four
You're pretty close now. To convert from a source range to a
target range, you first shift the source range to
[0..some-value] using
shift-source. Next, you convert from that
0-based range to another 0-based range with
range-scale. Finally, you convert from that
0-based range with shift-target.
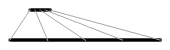
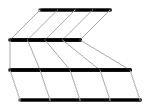
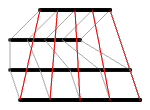
For example, the following two images show the steps involved in converting from the range [30..100] to the range [10..130] and then the same steps with an overlay of the final transformation.
d. Put your procedures together into
(. Be sure to test your
procedure with some of the examples given at the beginning of the
problem.
range-convert val
source-lower
source-upper
target-lower
target-upper)
Reflection: Backwards Ranges
e. What happens when range-convert is given a
“backwards” range, such as [0..-100] or [100..0]? Why
does it still work, or not work? For example, consider the results of
( and
range-convert 2 0 4 0 -100)(.
range-convert 25 100 0 0 4)
Problem 3: A Sepia-Tone Filter
a. Write a new color transformation, rgb-fade-to-brown,
that transforms black to dark brown and white to white. Other colors
should get proportionally browner. For example,
>(rgb->rgb-list (rgb-fade-to-brown (rgb-new 0 0 0)))(139 69 19)>(rgb->rgb-list (rgb-fade-to-brown (rgb-new 255 255 255)))(255 255 255)>(rgb->rgb-list (rgb-fade-to-brown (rgb-new 128 128 128)))(197 162 137)>(rgb->rgb-list (rgb-fade-to-brown (rgb-new 64 128 192)))(168 162 196)
Here's a strategy. In your procedure definition,
use let to assign the name brown to
the rgb representation of a dark brown color.
(“saddlebrown”, or 139/69/19, is quite nice.)
Recall that the components of the original color are in the range [0...255].
Use range-convert to compute a new red component
that is in the range [(rgb-red brown)..255]. Compute the new green
and blue components in a similar way.
b. Very old photographs were taken in black and white (or greyscale) and then printed with dark brown ink derived from the cuttlefish (a relative of the squid). (See http://dictionary.reference.com/browse/sepia.) Modern images that simulate this antique effect are called sepia-toned.
Write a new procedure, (, that produces a sepia-toned version of
image, leaving the original unchanged.
Each pixel should be converted to a shade of grey, and then made browner.
(Hint: You already have procedures to do both of these things.)
image-sepia
image)
For example, here is the result of applying
image-sepia to Professor Davis's StalkerNet
image.
|
|
 |
Problem 4: A Color-Blend Filter
We can extend the ideas from problem 3 to produce truly weird images reminiscent of some of Andy Warhol's pop art prints.
a. Write a new color transformation,
(, where all
three parameters are rgb colors. If rgb-recolor color
dark light)color is
black, then the result should be dark. If
color is white, then the result should be
light. Any other color should be converted to a
new color where each component ranges between that component's value
in dark and light. In other
words, whereas the red component of color could
be in the range [0..255]. If the red component of
dark is 64 and the red componenent of
light is 192, the new resulting color's red
component should be in the range [64..192]. You should use a
strategy similar to that for rgb-fade-to-brown.
For example,
>(rgb->rgb-list (rgb-recolor (rgb-new 0 0 0) (rgb-new 0 0 255) (rgb-new 255 255 0)))(0 0 255)>(rgb->rgb-list (rgb-recolor (rgb-new 255 255 255) (rgb-new 0 0 255) (rgb-new 255 255 0)))(255 255 0)>(rgb->rgb-list (rgb-recolor (rgb-new 64 128 192) (rgb-new 0 0 255) (rgb-new 255 255 0)))(64 128 63)>(rgb->rgb-list (rgb-recolor (rgb-new 64 128 192) (rgb-new 28 11 53) (rgb-new 192 255 128)))(69 133 109)
b. Use your new color transformation to write an image transformation,
(. Each pixel
should be a color between image-colorscale image
dark light)dark and
light, depending on its brightness.
This procedure should use a strategy similar to that for
image-sepia: Each pixel should be converted to
greyscale, and then rgb-recolor applied.
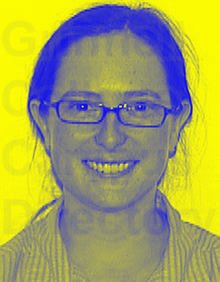
For example, here is the result of
(.
image-colorscale source
(color-name->rgb "blue")
(color-name->rgb "yellow"))
|
|
 |
Important Evaluation Criteria
We intend to evaluate your assignment on the correctness and elegance of your solutions. That is, have you correctly implemented the algorithms we describe, and have you done so in a clear and reasonably efficient manner.
Postscript: Generating diagrams
You may be wondering how we created all of the diagrams in Problem 2. Since MediaScript knows how to draw lines, we wrote code that draws the source line, draws the target line, picks five representative points on the source, and shows the result on the target.
(define illustration-left 10)

(define illustrate-conversion!
  (lambda (image
           source-row source-lower source-upper
           target-row target-lower target-upper)
    ; Draw the source and target
    (context-set-brush! "Circle (03)")
    (context-set-fgcolor! "black")
    (image-draw-line! image
                      (+ illustration-left source-lower) source-row
                      (+ illustration-left source-upper) source-row)
    (image-draw-line! image
                      (+ illustration-left target-lower) target-row
                      (+ illustration-left target-upper) target-row)
    ; Draw a few lines to show mapping
    (context-set-brush! "Circle (01)")
    (context-set-fgcolor! "grey")
    (show-conversion! image source-lower
                      source-row source-lower source-upper
                      target-row target-lower target-upper)
    (show-conversion! image (+ source-lower (* 0.25 (- source-upper source-lower)))
                      source-row source-lower source-upper
                      target-row target-lower target-upper)
    (show-conversion! image (+ source-lower (* 0.5 (- source-upper source-lower)))
                      source-row source-lower source-upper
                      target-row target-lower target-upper)
    (show-conversion! image (+ source-lower (* 0.75 (- source-upper source-lower)))
                      source-row source-lower source-upper
                      target-row target-lower target-upper)
    (show-conversion! image source-upper
                      source-row source-lower source-upper
                      target-row target-lower target-upper)
    ; Clean up
    (context-update-displays!)))

(define show-conversion!
  (lambda (image
           val
           source-row source-lower source-upper
           target-row target-lower target-upper)
    (image-draw-line! image
                      (+ illustration-left val)
                      source-row
                      (+ illustration-left (range-convert val source-lower source-upper target-lower target-upper))
                      target-row)))
For example, here is the code used to generate the penultimate diagram.
(define canvas (image-new 150 110))
(image-show canvas)
(illustrate-conversion! canvas
                        10 30 100
                        100 10 130)
(illustrate-conversion! canvas
                        10 30 100
                        40 0 70)
(illustrate-conversion! canvas
                        40 0 70
                        70 0 120)
(illustrate-conversion! canvas
                        70 0 120
                        100 10 130)